If you're like me at all and have been replacing live shows with photo shows for the past 9 months, you're aware there isn't a platform that is great for photo showing. Facebook, SmugMug, SnapBraggin all have their positives and negatives but I think one of the greatest challenges is having to reupload your photos for each show. (Some show leagues like MEPSA and TOPSA side step this but if you want to show in shows not in those leagues, you're SOL.)
So that's where PonyBytes comes in. The idea behind the site seems to be - upload your photos once to your personal gallery and then copy it to whatever show you like. I'm 500% down with this idea. My album of OF Breyer Mini photos on my phone has 730 photos right now. The less I have to repetitively upload the better.
So let's get started!
Signing up is fairly easy. Just go to http://ponybytes.com/ and click Register in the upper left:
This takes you to a pretty standard form. Enter your info - your username can be whatever you want, it doesn't have to be your real name - and submit the form and confirm your email. Now we are in!
First thing to do is to set your real name so the show hosts can make sure you are one of the registered entrants when you try to join a show. This is really easy to do. Go to User CP on the upper left:
|
|
| I'm 90% sure CP stands for Control Panel. |
From there, scroll down a little until you see the Edit Profile option on the left:
|
|
| I'm apocalypticchick, per usual. |
There's several optional things you can change here if you want - all you need to do is fill out this section with your last name and your first name:
|
|
| Last name first, first name second. |
Once you're done, DO NOT FORGET TO CLICK UPDATE PROFILE to save your changes. The button is kind of small and at the bottom of the page.
Now onto the fun part! Photo uploading, whoo-hoo!
The key thing to remember is that pretty much everything lives under Gallery. The link for the Gallery will always be at the top of the page and takes you to a page that looks like this:
|
|
| The big link at the top takes you to the main Gallery. There's a link lower on the right for MyGallery - that's where you'll upload your own photos. The galleries listed under the Gallery Name section are currently running photo shows (they could be in any state - open for entries, open for upload, closed, being judged, etc.). |
Before worrying about a show, let's just get some photos on here. The whole point is to be able to upload once and then copy to shows, so let's test this. Click the MyGallery link to go to your personal gallery area.
Your gallery is pretty blank to start with:
|
|
| You can use the default My Gallery folder if you want. |
But, you can add as many folders (Categories) and subfolders (Sub-Categories) as you like! I am a data nerd and I have 5,000,000 photos, so I'm going to organize my area. This is totally optional, and you can move and delete and rearrange things later!
|
|
| You can see I already made a lot of Categories. Click the "Add Category" link at the bottom to make a new one. |
You only need to enter a title for the Category, everything else is optional:
|
|
| I'm going to add a Performance album. I only have one Performance photo but why not? Don't forget to hit Add Category to save your new album! |
Voila, now we have a Performance album/folder as well! Within a lot of these I also made sub-categories. (See aforementioned 730 Breyer Mini photos.) I want an easy way to find the horse I am looking for. My system looks like this:
|
|
| Is it excessive? Maybe. Do I care? No. #DataNerdForLife |
You make Sub Categories in the exact same way we made a category above, except the link says "Add Sub Category" once you have clicked into your Category. In the photo above, I'm in my "OF Stone Mini" Category. Because I'm super extra, I also made "Breed" and "Collectibility" Sub Categories within each of these Sub Categories to keep the photos for Breed and Collectibility separate (mainly because they will be tagged with different info and I don't want to accidentally copy a Collectibility photo to a Breed show or vice versa). My final setup, at the deepest level, looks like this:
|
|
| You can see from the breadcrumbs at the top that I'm in the "Draft Breed Molds" folder within the "OF Stone Mini" folder. |
Ok, I think I lied earlier, *NOW* we are ready to upload a photo!
BONUS: You can totally do this from a mobile phone! All my photo show photos are on my phone, so this is CRUCIAL for me. The steps on the phone are exactly the same as on my laptop. First, navigate into the album you want to add a photo to. I'm going to stick with my Draft album in Stone Minis. I want to do Breed first, because I know that info off the top of my head, so I'm going to click into that album. From there, just click Add Picture:
|
|
| This is a screenshot from my phone. |
One thing to keep in mind is that you HAVE to enter a title for your photo. For now, I'm just putting my horse's show name as the title. You can (and probably will need to) change it when you copy the photo to a show. You can enter the description now if you want, or we can do it later. I'm gonna do it later. Navigate to the photo you want on your phone or computer, and make sure to hit Add Picture for it to upload. Now I have my first photo uploaded:
Click the photo thumbnail to see the page for that photo. This is also where you can see the description and edit things. I'm going to want to edit his description. The format for this is REALLY IMPORTANT:
ID*[you horse's ID]|NAME*[your horse's name]|EVENT*[your event]|OTHER*[whatever else you want to say about your entry]
The site reads this and parses it by looking for the asterisk (*) character, the pipe (|) character, and the keywords (ID, NAME, EVENT, and OTHER). If you don't use this format, the site won't be able to parse the info correctly. My little draft above is going to be assigned ID 004, his name is Argenteum, his photo is for Breed events, and he is a Shire Stallion, so his info will look like this:
ID*004|NAME*Argenteum|EVENT*Breed|OTHER*Shire Stallion
Click "Edit" below the photo as shown above, and write your horse's info in the Description field. Don't forget to hit Edit Picture to save your changes!
|
|
| (Ignore the fact that I changed him from 003 to 004 after I took this screenshot, whoops.) |
Let's check that it worked. Go to the Reports link at the top, next to the Gallery link. Click My Item Nos. to see all your models that you have assigned IDs to:
|
|
| It worked! (Ignore the 3 I did yesterday.) |
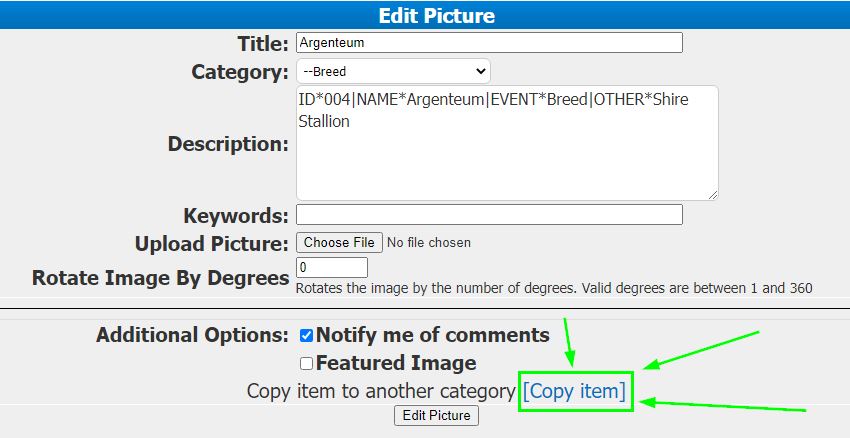
Sweet, now we get to add him to a show! For now, we want the "Fake Show to Practice Uploading" since we are just playing around. Open the photo you want to upload to the show, and go back to the Edit view (where we changed the description earlier). This time, instead of changing anything, click the option to "Copy item to another category [Copy item]":
|
|
| This is where you DON'T want to click Edit Picture. |
Select the class within the show you want and then click Copy Item:
|
|
| You'll see shows under the Category option. If you want to copy the photo to another one of your albums (for example when I want to add a Collectibility photo for this guy) you'll use the User Gallery dropdown. |
Now it's time to see if that worked (and to change the title of the photo to whatever the show host wants it to be). You can get to your photo in the show three ways: 1) once you copy it, the site should take you to a view of all your photos uploaded everywhere and the one you just did should be the first one that appears, if you click it you should see breadcrumbs at the top indicating what class and show it is in; 2) go back to the main Gallery, find the show you want, navigate into the class you want, check if your photo is there; 3) go to the Reports area again, except this time click My Entries, find the horse/show/class combination you just added and click the horse's name to edit. Change the title to whatever the show host requested (e.g. Breed & Gender). Note that this will only change the title for the photo within that show, it won't change it for your user gallery.
|
|
| Done! You can see from the breadcrumbs that he is entered in the OFP Arabian class (LOL) for the Fake Show to Practice Uploading, and his title is now "Shire Stallion" instead of his name. |
So, that was A LOT. Thanks everyone who read this far. There's more you can do with the site for sure - be sure to
READ THE HELP DOCUMENTATION.
Thus far this seems pretty cool. I like the different ways of being able to see my data under Reports, and I like that I can upload from my phone. It doesn't do multiple uploads at once very seamlessly the way Facebook and SmugMug do (especially since you have to enter a title for the upload to work) but hopefully that inefficiency will not matter once most of my photos have been uploaded the first time. I also with I could add the photo from the show/class page, rather than having to find the photo first and then add to the class, but I think I'm just used to doing it one way and I will adapt. Can't wait to try it out on a real show!
P.S. Enter the Winter PonyBytes Fun Photo Show if you haven't yet!


No comments:
Post a Comment